
A Little History
The Revolutionary War privateer RATTLESNAKE was designed in 1779-80 by John Peck, a Boston naval Architect; she was built in Plymouth Massachusetts. In style she resembled a miniature frigate, and had a separate quarter deck and forecastle. These features are rather unusual for a privateer. She carried up to 20 guns (probably six and nine pounders) and had a usual complement of 85 men.
Little is known of her career except that it was brief. On her first cruise she seized over one million dollars of British goods and she was ordered to be captured at any cost. Late in 1781, she was taken by the British firgate ASSURANCE (44 guns) and brought into the Royal Navy as the COMMORANT (14 GUNS). Sometime around 1784 she was renamed RATTLESNAKE and soon afterwards sold out of the British Navy.
The vessel was unusually fast, and her full lines were recorded by the British Admiralty after her capture and have come down to us today.
A Little Background
I first became aquainted with this model when I was in high school. I picked up a Model Shipways catalogue at my local hobby shop. I believe that was back in 1963. I would pour over that catalogue looking at the pictures of the various ship models and my favorite became the RATTLESNAKE. It just really looked – well it looked like a miniature frigate which is what it was. I love sailing ships because the rigging is so complex and that makes it fun to look at when the model is finished. I had built several wooden ship models from scratch when I was in Jr high – they were more of a carved balsa block for the hull and balsa sticks for the masts. I rigged them up after a fashion – they never lasted long though. I don’t think I was very careful with stuff then – kinda like a bull in a china shop and at least one of these met its demise because it was sat on. A few years later I did build the 1/96 scale Revell ships – USS Constitution and the clipper ship Thermopale – I fully rigged these and they just looked cool. I didn’t put them in cases tho and soon house dust did their work on them. The Constitution actually lasted many years on my parents fireplace mantle – until my mom tried to dust it one day. The dust finally got to her too I guess. The ships boat for the Constitution actually has a second life as the basis for the Admirals Yacht on my model of the Yamato.
At any rate I developed a real longing to someday build a wood ship model.
Fast forward to 1975. I was out of college and working professionally and newly married to boot. I happened to spy the very model of my dreams in a local hobby shop. Well – I bought it for $55.00 + tax.
The Model
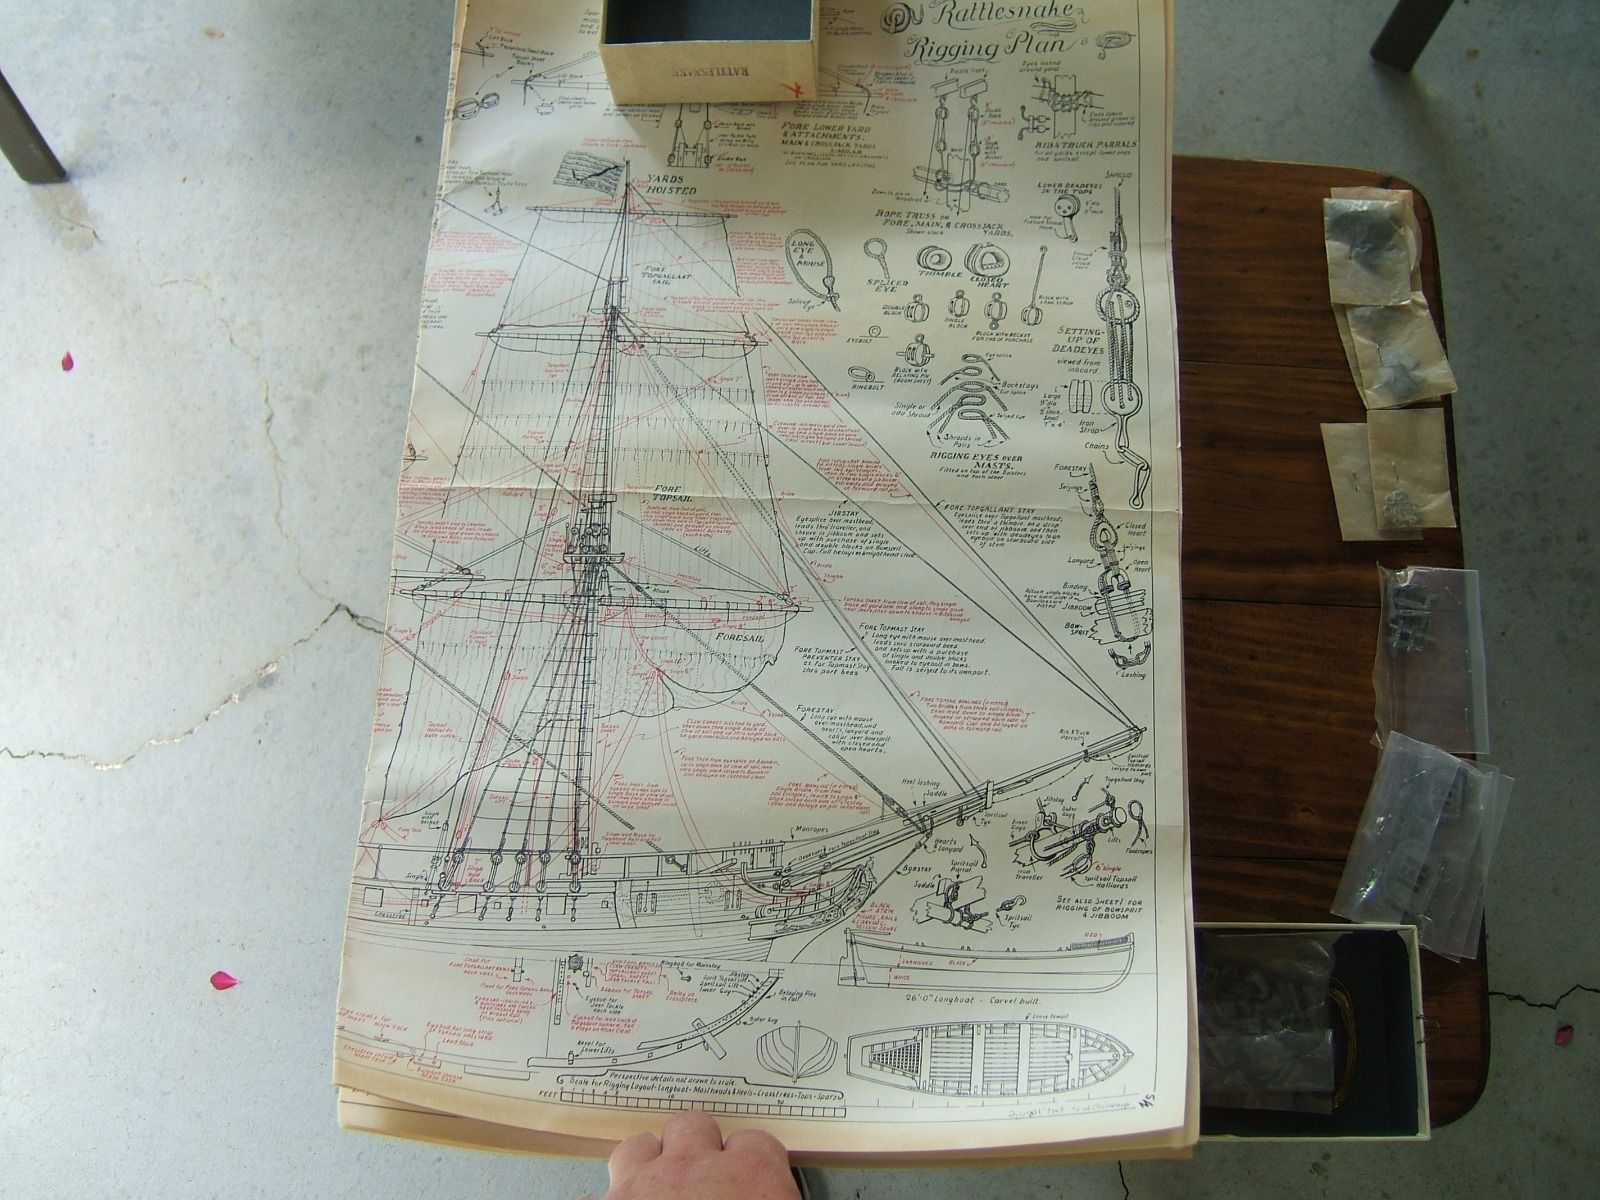
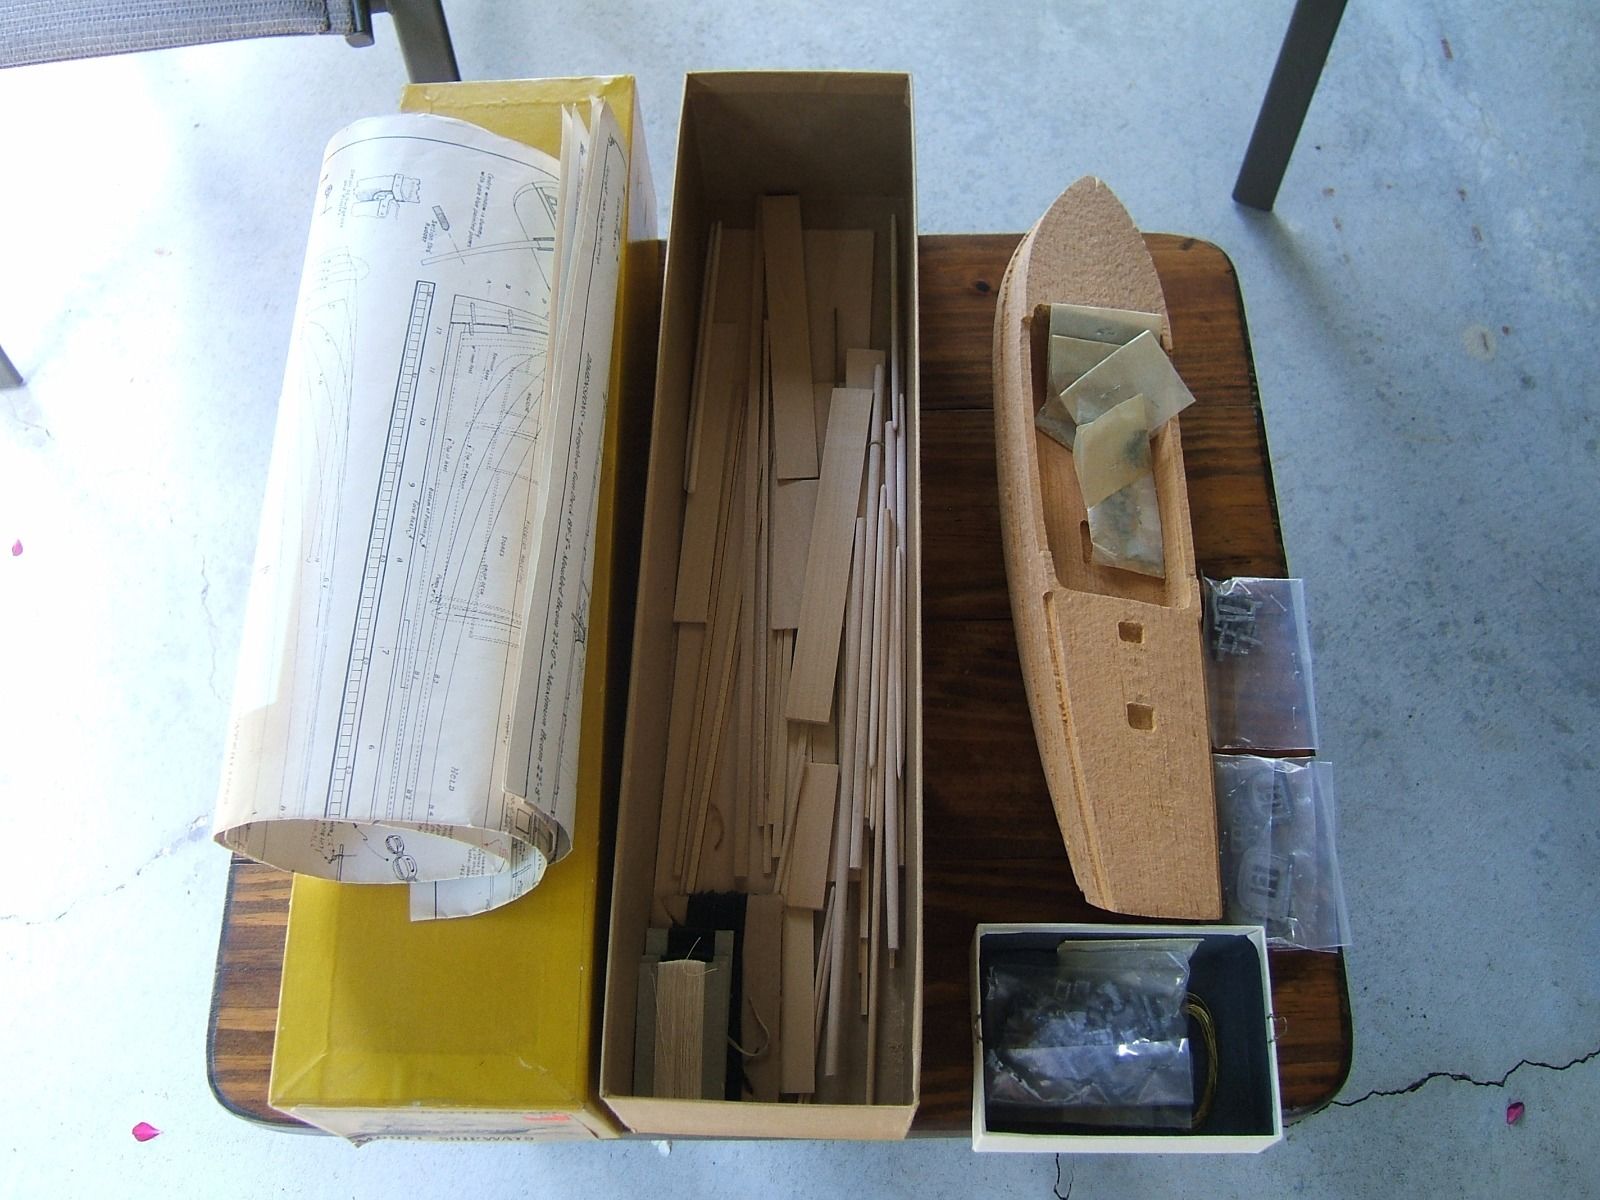
When I opened the box I must say I was pretty dismayed – I mean I don’t know what I expected – I had seen pictures in the catalogue of what was in the kit. The scale is 3/16 inches to the foot or 1/64th scale. Inside the box was a machine carved (rough) white pine hull, a fistfull of dowells and some small packages of fittings – pot metal, and wood blocks etc. Also there was some rigging thread and two big full size sheets of plans and a block of wood to carve the ships boat from. I guess what got me the most was the instructions. It was about 4 pages of the briefest information I could imagine – basically it said – put it together and oh by the way good luck.

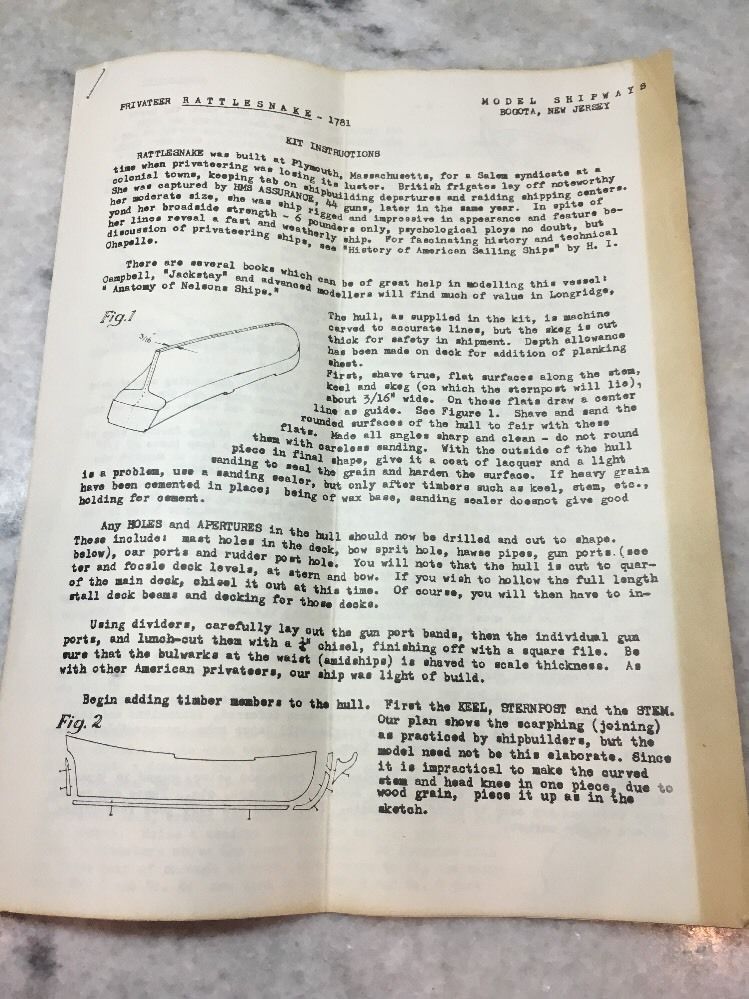

Construction
After a few months of opening the box and looking at it from time to time and feeling sorry for myself – I realized that it wasn’t going to build itself.
A friend (thanks Dennis) loaned me a Dremmel type router and some bits. I routed out the hull in the forward and aft areas so they could be detailed. I sanded down the hull to the proper dimensions and eventually added the main deck (scribed wood decking). I added a few bits and pieces to the hull and there it sat for quite a while. I just wasn’t getting anything done. This was when our kids were coming – they kept coming till we had five and Teresa and I said whoa – that’s enough. So we were pretty busy at home – I mean we were really busy at home with these little guys – it was a lot of fun though.
So the ship wasn’t getting built. One day I had the bright idea to take the thing to work and building it there at lunch time. That’s what I finally did. I had a drafting table in an adjacent room that I set things up on and I also had a really understanding boss (thanks Jon). Remembering the dust problem – I kept the hull covered with cheesecloth and as the build moved farther on I built a display case for it too.
The construction time went on for 9 years – from 1975 to 1984 with some gaps when I stopped – there were times I just got sick and tired of working on it and I would have to force myself to continue!
Here are some photos taken during construction. Sorry about the poor quality – but at least you can see some of the below deck detail.
Here are some of the details I added:
- Replaced all of the pot metal castings of the mast tops and caps with built up boxwood structures exactly as depicted on the plans – lots and lots of extra pieces here.
- The main deck fore and aft sections are fully detailed – even though they are hidden by the forecastle and quarter decks. That’s what modelers do – they detail areas that you can’t see unless you are a fruit-fly.
- All of the cannons are fully rigged with block and tackle.
- Cannon balls came from 12 gauge shotgun shells.
- The aft and stern window metal frames were replaced with boxwood frames, glass was replicated with white glue which dried transparent.
- Stern relief was accomplished with white glue and micro balloons mixed together.
- All yardarms were rigged with proper foot-ropes.
- Lower yardarms properly rigged with parrels (I used small beads) to hold them to the masts.
- Sails were added using balooner cloth (very tight weave cotton cloth) that was sewn up by my wife (thanks Teresa) exactly as illustrated in Steele’s Elements of Mastmaking Sailing and Rigging.
- All sails had lashing ropes added as well as the proper rigging rope at sail edges.
- Ship was completely rigged using Cuttyhunk silk thread drawn through beeswax.
- All lines tied off with proper knots – no granny knots used.
- All shrouds rigged properly and all ratlines attached with clove hitches. That alone took the better part of a year and I really hated doing it – it was just so monotonous!
- Many additional blocks of various sizes were added to complete rigging.
- Ships boat built up clinker style – just like full size one.
- Model painted with Pollys acrylic.
- All yardarms were tapered by hand and boxwood added to the center of those that required it to make up an octagon shape.
Ok – that ’s enough on that.
I put the model in a case that I built to protect it from flying footballs – remember we had 5 kids growing up! The case and ship model has held up very well over the past 23 (as of 2007) years since I finished it.
I love to occasionally take this model down off of the shelf and just look at it. I always have to clean off the case top what with dust etc. There is so much going on that you eyes just feast on the details – that’s what so wonderful about fully rigged sailing ships. I think the sails add a sense of motion and are positioned as if the ship is tacking. In this way the ship can be displayed to show off the sails on one side or the complete rigging if turned to the other side. With all of that detail you can just sit and look at this area and that for quite a while.
I have taken this model to a few model shows and it’s won some first places – but the curious thing is that when I take it – along with my 1/200 Yamato battleship – it’s the battleship that really gets the most attention. I guess that there just isn’t the interest out there for wood ship models. Go figure. Well – now I have a wood ship model to look at.
It only took me 9 years to finish – sometimes you should be careful what yo wish for – you might just get it. Actually wishing never really gets you very far – you have to provide all of the work too – and this was a lot of work but it’s totally worth it now that it’s finished. I wonder how many of these things were purchased with grand ideas and plans, but were never finished. Kinda like our lives – we have grand ideas and plans to do this and that – but if they never get beyond the thinking stage – that’s all they are – thoughts. But if you are determined and whack away at it long enough you can finish. I’ve seen this over and over in life and it applies to everything and everyone.
And that’s the end of my thoughts – now go build something.
Wanna see more pics? GO HERE.